
Installing firmware update
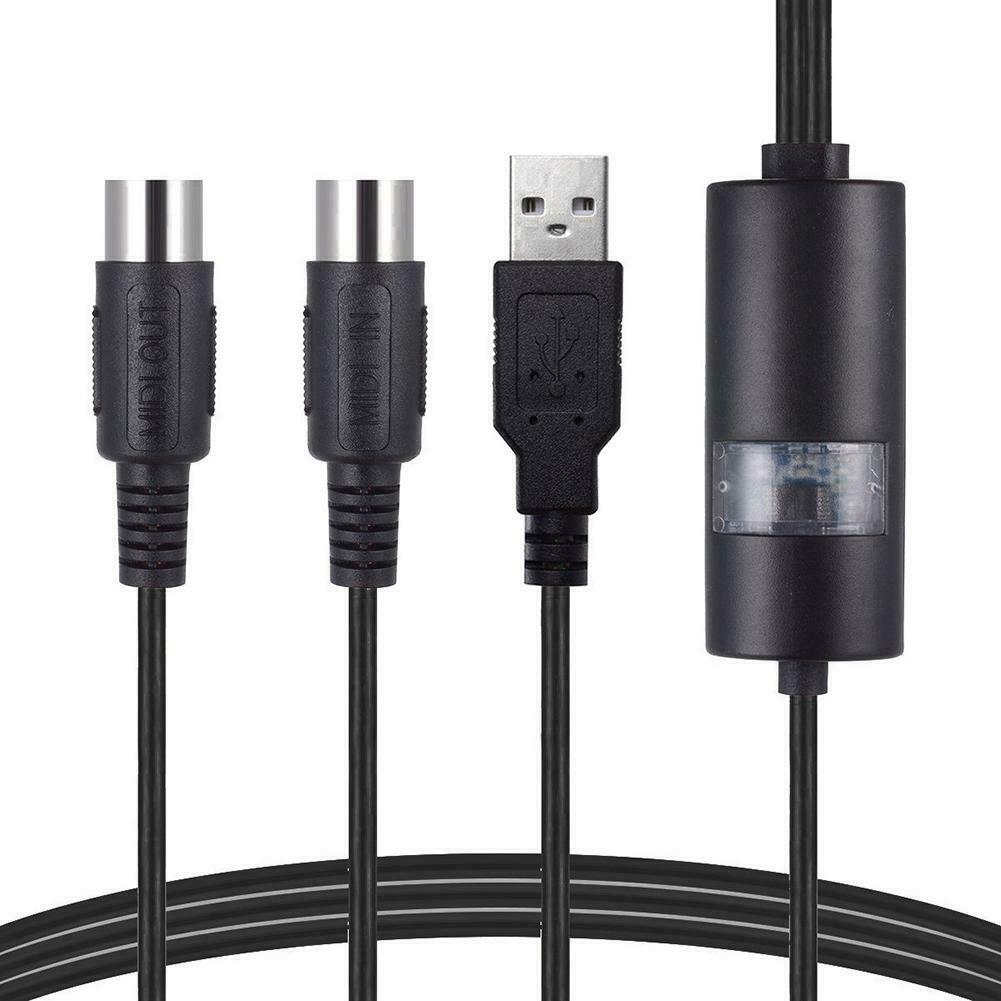
Before even thinking about reflashing firmware over MIDI make sure you have a decent MIDI interface and MIDI on your computer is configured properly. MIDI implementation in Windows has issues, and CoreMidi is a disaster, but USB-over-MIDI (an unfortunate consequence of everyone using a laptop) only makes things worse. In case you have one of those dirt cheap Chinese USB to MIDI cables based on CH345 chip with the optocoupler left off to cut the costs by a few cents, you might be out of luck. Those cables are good enough for the simplest MIDI messages (NOTE ON, NOTE OFF) but fail with any messages longer than 3-4 bytes.
Some of the MIDI USB Interfaces known to work:
Elektron TM 1 Turbo Midi interface |
Some of the MIDI USB Interfaces known to NOT work:
Alesis USB MIDI Cable |
| This cable sold on eBay, AliExpress and Amazon is known to work: | The cheapest cable sold on eBay and AliExpress is known to NOT work: |
 |
 |

Here, 09 means the Electribe device is listening on MIDI Channel 10, so change your settings accordingly if needed. The response should be 15 bytes long, some digits could differ due to a different firmware version. Naturally any other MIDI monitoring tool can be used as well.
In case this procedure is not working please do not attempt to reflash the firmware and contact shaman@electribe.cc.
Reflashing firmware
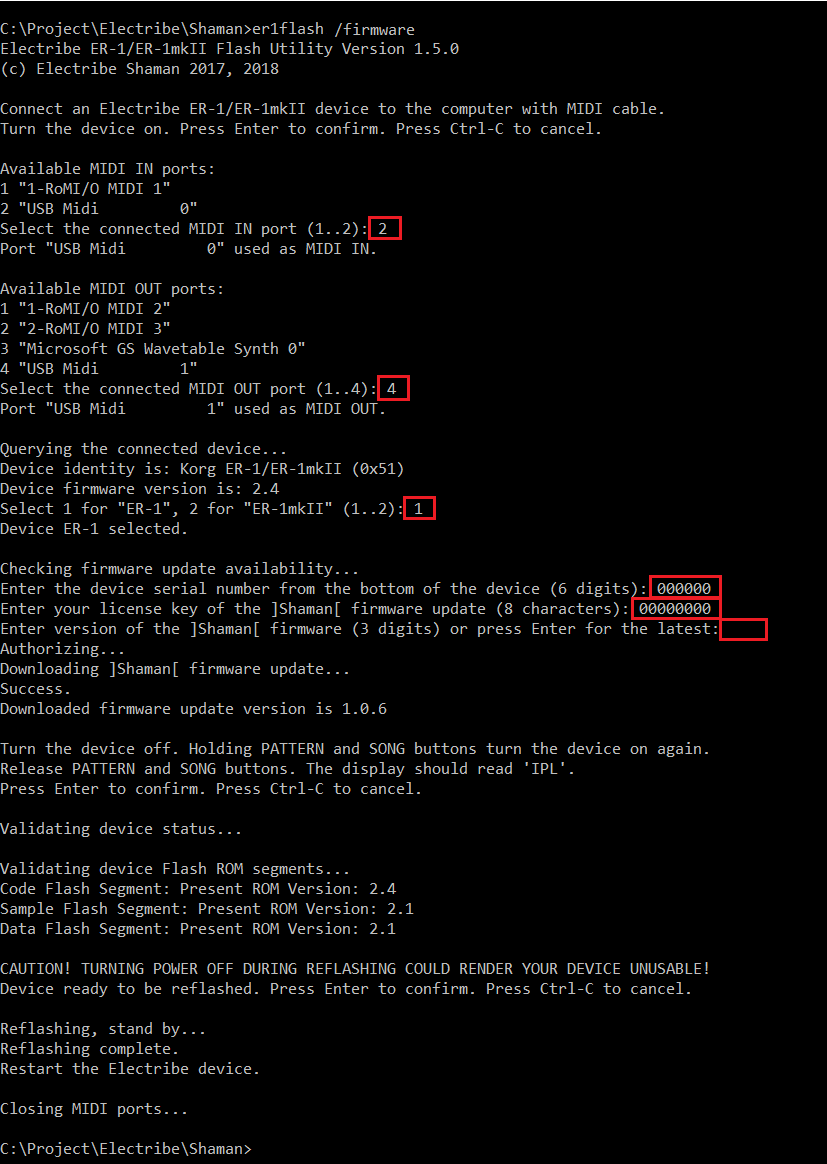
Once MIDI connectivity has been set up you can proceed with downloading and installing firmware update. Everything required for this is handled by Electribe ER-1/ER-1mkII Flash Utility (erflash):
Always make sure that you do not have any other MIDI utility (eg. MIDI-OX, Bome etc.) running at the same time, as MIDI ports are not shared. Make sure your Electribe is listening on MIDI channel 10 for the Installer utility to work. Finally, make sure that SysEx is enabled on your device. Either an ‘o‘ is flashing in the rightmost column of MIDI/MIDI FILTER menu (see ‘MIDI filter settings’ in Electribe ER-1 Owner’s Manual) or MIDI/DUMP menu option is selected when starting installation.
Flash Utility is a command line program. To launch it:
The screen will look like this:
 |
|
To validate successful reflashing turn your Electribe on while pressing and holding SHIFT button. Factory firmware version is displayed. Turn off the device and turn it on while pressing and holding PATTERN SET button. Now, Electribe Shaman Firmware update version is displayed. In case the display reads 3-F you still have the factory firmware. Pressing STEP16 resumes normal operation.
Loading Custom Samples
Before you start, turn Memory Protect OFF on your Electribe (GLOBAL > PROTECT > oFF).
The screen will look like this:
 |
|
Reporting An Issue
Electribe ER-1/ER-1mkII Flash Utility has been tested and found working on several laptop and desktop computers running 64-bit Windows 10 with different USB-to-MIDi cables. Due to some limitations in Windows and macOS MIDI implementations, USB MIDI Cable drivers and crippled USB cables, MIDI operations might occasionally fail. In those cases press Ctrl-C to cancel and repeat the whole procedure. Be extra careful during reflashing, those situations are clearly identified by CAUTION! prompts. However, in the unlikely event that something unexpected occurs, please report this immediately via email.
Please prepare the following information:
- Date and time of the incident (helps to link this with logs on server);
- Windows version and type of the computer;
- MIDI cable type (direct MIDI cable, USB-to-MIDI cable; for the latter, a snapshot of the cable would help);
- Serial number of the device (license code is NOT required);
- Screenshot of the command window (similar to the one above) or the session copy-pasted from the window;
- ER-1 Flash utility log file (erflash.log) that is created and stored in the working directory (the one where erflash.exe resides);
- Snapshot of the Electribe device showing the state of the display, LEDs and buttons after failure.
Additional narrative about the circumstances, what else was running on the computer etc. would also help.